Folders
Working with Folders
Your computer can store lots of different files, these could be:
- Word documents
- pictures
- music
- videos
- and so on...
To keep these files organised (and to help your computer work with them efficiently) you can store them in folders. You can create your own folders and give them names that show what type of files you store inside them. You can even have folders inside folders - these are called sub-folders.
Start Windows Explorer/File Explorer
The program you use to work with folders is called Windows Explorer. The way you start Windows Explorer depends on the version of Windows running on your computer, but the keyboard shortcut should work on all versions. Windows Explorer was renamed File Explorer in Windows 10.
Keyboard Shortcut
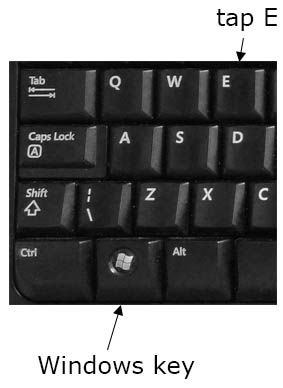
- Hold down the Windows key (bottom left of the keyboard, between Ctrl and Alt)
- While it's held down, tap the E key once
Windows 7
- Click the Start button
- Click Computer on the right hand side of the Start menu
Windows 10
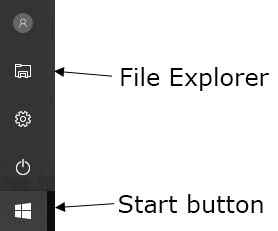
- Click Start
- Click the File Explorer icon
top of page
Windows Explorer layout
Windows Explorer can look a bit confusing at first, but a few of the features should be familiar if you've used a web browser before.
Windows 10
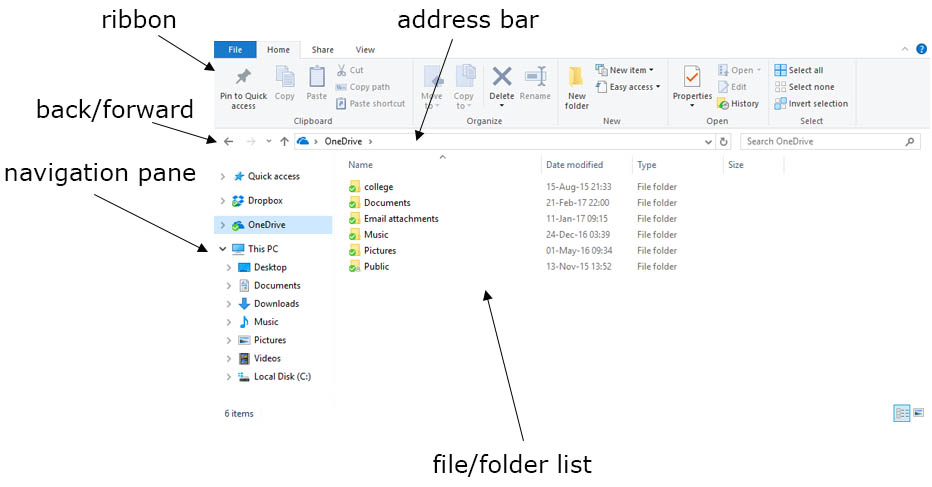
- The ribbon is a the top of the window. There are File, Home, Share and View tabs on the ribbon and the Home tab is shown above. As you can see, the Home tab has Cut, Copy, Paste, New Folder and Delete buttons.
- The address bar shows you which folder or drive you're currently looking at. This can be useful to know - if you're in doubt, check the address bar.
- The back, forward and up buttons work the same way as a web browser, allowing you to go back and forward between folders you have already visited. The up button takes you to the parent folder of the current folder, so if you're looking at a folder inside Documents and you click Up you would go to the Documents folder.
- You can click on items on the navigation pane on the left hand side and the contents of that folder or drive will be displayed in the file list on the right. Remember you can check the address bar to confirm which folder you're looking at.
- Items on the navigation pane may have an arrow at the left hand side >. You can click this arrow to see a list of sub-folders below (each of the sub-folders may also have a clickable arrow).
Windows 7
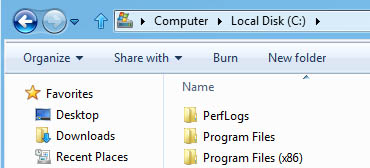
Most of the features are the same on the Windows 7 version of Explorer. Instead of a ribbon there's a Command Bar at the top, with New Folder, Open and Organize buttons. Cut, Copy, Paste, Delete etc are found on the Organize drop-down menu.
top of page
The address bar
The address bar tells you which folder or drive you're looking at right now. Make sure you check it before you carry out an action like create a folder or copy & paste a file because the address bar will show you where that file or folder will go.

- The address bar in the image above shows the current folder is called level 4 so the contents of level 4 will be shown in the file list.
- You can see that level 4 is a sub-folder of a folder called Core skills (ie level 4 is inside Core skills).
- Similarly, Core skills is a sub-folder of Courses and so on
- You can open the Courses or COLLEGE or Clydebank (and so on) folders by clicking on them in the address bar. The file list below will then show the contents of that folder.
top of page
Open a folder
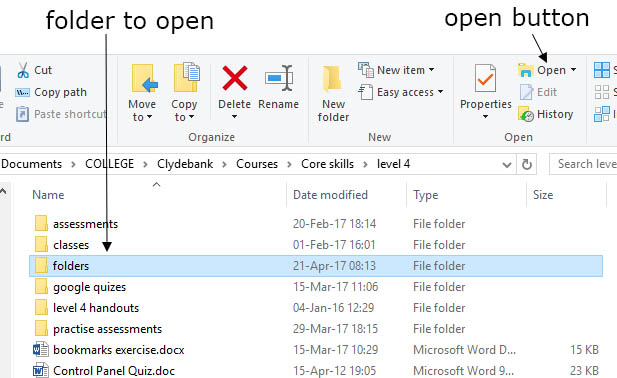
In the next example, we will open a folder called folders which is in the level 4 folder.
Method 1: double-click
- Double-click on folders
- The folder should open and its contents will be displayed in the file list
Method 2: the open button
- Click on the folder you want to open
- click the open button on the command bar (Windows 7) or on the ribbon (Windows 10 - shown above)
- The folder should now be open
top of page
Create a folder
- Navigate to the drive or folder where you want to put the new folder. You can open folders using the method above to make sure your folder goes in the right place. Make sure the address bar shows the location where you want the new folder to go.
- Click the New folder button on the command bar (Windows 7) or on the ribbon (Windows 10, New section)
- The new folder should now appear in the file list and it will have a temporary name of New Folder. You don't need to click in the box to give it another name, just start typing
- Type the name of the new folder
- Press Enter on your keyboard to confirm you have finished
top of page
Delete a file or folder
When you delete a file or folder it will be sent to the Recycle Bin. Later, you could recover the item from the bin if it was deleted in error or you could empty the bin to free up some space on the hard disk.
Method 1: Delete key
- Click on the file/folder you want to delete - it should be highlighted after you click it
- Press the Delete key on your keyboard
- Click Yes to confirm you want to send the file/folder to the Recycle Bin

Method 2: Delete button
- Click the file/folder you want to delete in the file list (not the navigation pane)
- Windows 7: Click the Organize button on the command bar then click Delete on the drop-down list
- Windows 10: Click the Delete button on the ribbon (in the Organize section)
- Confirm you want to sent the item to the Recycle Bin
top of page
Saving files in the correct folder
When you save a file you can choose which folder to put it in, as well as give the file a name. We'll have a look at saving with Microsoft Word. The Save As dialog box should look familiar if you've used Windows Explorer because the file list, navigation pane and buttons are similar
Saving a file with Microsoft Word
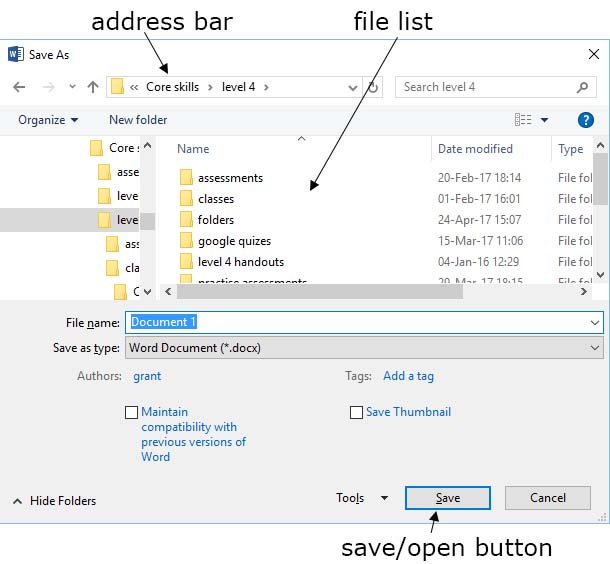
This example shows how to save a Word document into the folders folder.
- Click File then Save as. A dialog box should appear that looks similar to the one above
- The file name box currently has Document 1 in it - this text is highlighted so you don't need to click in the box, just start typing to change the file name
- To change the folder to folders, click on folders in the file list
- Click the Open button at the bottom right of the dialog box.
- Check the details are OK before you save - the address bar should show that you're in the folders folder and the file name should be correct.
- If everything is OK, click the Save button at the bottom right
Checklist before you save:
- Check the address bar to confirm you are saving in the right folder
- Check the file name
top of page
Moving files - Copy & Paste
You might want to move files from one folder to another, or even from one drive to another - for example transferring files between your computer and a portable USB drive. To do this, you can Cut or Copy the file then Paste it in its new location.
What's the difference between Cut and Copy?
- If you Cut the file it will be removed from the original location, you can then paste it somewhere else
- The other option is to Copy the file - this means a copy will remain in the original folder and a second copy will be pasted in the destination folder
4 steps to Copy & Paste:
- Select the file you want to copy by clicking on it
- Choose the Copy (or Cut) command
- Navigate to the destination folder: make sure this folder is open and its name is shown in the address bar
- Choose the Paste command
Windows 7 example:
- Open the folder that contains the file you want to move
- Click on the file in the file list - it will be highlighted
- Click the Organize button on the command bar then choose Cut/Copy from the drop-down list
- Navigate to the folder where you want to put the file - make sure that this folder is shown in the address bar
- Click the Organize button on the command bar and select Paste
- You should now see the file in its new folder
Windows 10 example:
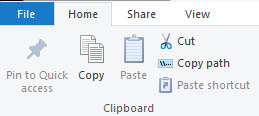
- Open the folder that contains the file you want to move
- Click on the file in the file list - it will be highlighted
- Click the Cut or Copy button on the Clipboard section of the ribbon (shown above)
- Navigate to the folder where you want to put the file - make sure that this folder is shown in the address bar
- Click the Paste button on the ribbon
- You should now see the file in its new folder
top of page