Microsoft PowerPoint
Microsoft PowerPoint is a program used to create presentations, it's handy if you're asked to give a talk on a subject and you want to display text, images, sounds, videos etc. Typically, you would connect your comuter to a projector and have your PowerPoint presentation shown on a screen.
Each presentation is made up of a number of slides. Many of the features of PowerPoint will be familiar if you've use Microsoft Word - images, formatting, saving and so on - but one difference is that you have to add a text box to a slide before you can start typing. Another difference is that slides are not added automatically, you have to add them yourself. Fortunately, when you add a slide you can choose one that already has text boxes on it.
To start Microsoft PowerPoint
This should work if you have Windows 7 or later.
- Click the Start button (or press the Windows key on your keyboard)
- Type in PowerPoint to search for it
- Click on Microsoft PowerPoint from the search results
PowerPoint should now start up.
top of page
The PowerPoint window
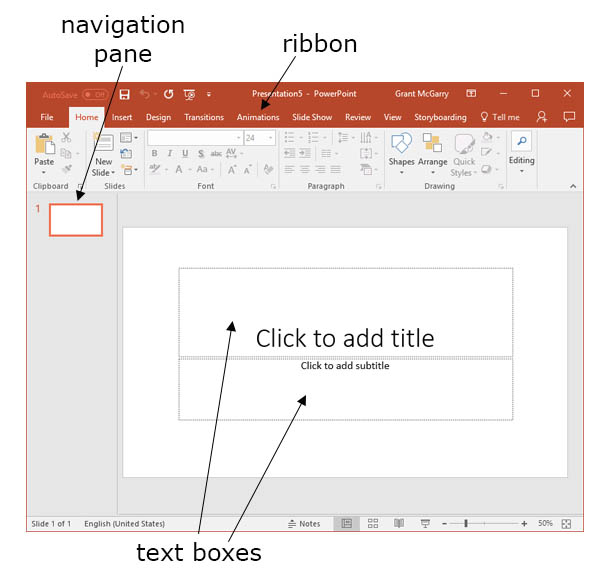
When you open PowerPoint, you'll see a window like the one above (this is the Office 365 version, yours might look slightly different but they all do the same basic tasks).
- The Ribbon is at the top of the window. This will be familiar if you've used another Office program like MS Word, and some of the same formatting controls are there. As you can see, there ribbons for File, Home, Insert, Design, Transitions, Animations and so on.
- The navigation pane at the left hand side shows you all the slides in your presentation, with the first slide at the top. At the moment there's only one slide, but you can add more and click and drag them in the navigation pane to change the order. Whenever you click a slide on the navigation pane, that slide will be displayed on the right.
- On the right of the navigation pane, you can see the first (and currently the only) slide. This is a Title Slide, which is what you get by default when you create a new presentation. When you add more slides to your presentation, you can choose a blank slide with nothing on it, or slides which already have text boxes and controls to add other items (like images):
top of page
Add a slide
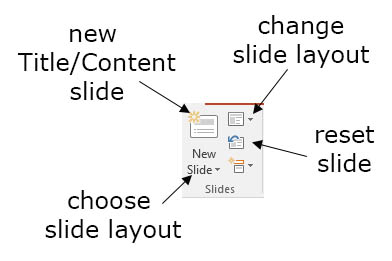
You'll probably want to add some slides to your presentation, otherwise it would be pretty boring. The button to do this is on the Home ribbon. As you can see, there are a few options when you add a slide. Note that the new slide will be added after the slide that's currently selected in the navigation pane.
- Click the top of the new slide button (on the slide icon, not the text) to add a Title & Content slide, this will already have 2 formatted text boxes on it.
- If you want to choose a slide with a different layout, click where it says New slide with a drop-down arrow. You'll see a selection of slide layouts, click on one to add it.
- You can change the layout of a slide with the slide layout button.
- If you accidentally delete/move/resize the text boxes on your slide, click the Reset slide button to return it to the original layout.
- Press the function key F5 to start your presentation and press the Esc key to end it. The play command is also on the Slide Show ribbon
top of page
Keyboard Shortcuts
Here's a few keyboard shorcuts for PowerPoint:
- F5 starts a slideshow
- Esc ends it
- Spacebar or right arrow advances to the next slide or animation
- left arrow goes back to the previous slide or animation
- W or comma pauses the presentation with a white screen, press the same key to continue
- B or full stop pauses with a black screen, same key to continue
During presentations, you can click on controls at the bottom left to get a pen, laser pointer, highlighter etc. Hover the mouse pointer at the bottom left of a slide to see these controls. You can also right-click on a slide to access them The pen can be used to write on slides or on paused black/white screens.
top of page
Themes

Themes are on the Design ribbon. They give you a quick way of making the appearance of your slides more interesting and giving them a consistent look.
To apply a theme:
- Click the Design ribbon
- Click a theme to select it
- Choose a variant to alter the appearance of your chosen theme (if needed)
- You can also Customize your theme if necessary.
top of page
Transitions between slides

Transitions control the way one slide changes to the next during a presentation - the new slide could fade in or slide in from the right, and so on. If you apply a transition to a slide, it will affect the way that slide enters and the way the previous slide exits.
To apply a transition:
- Click on the slide you want to apply the transition to. Remember the transition affects the way this slide enters the presentation, not the way it exits.
- Click theTransitions ribbon
- Click a transition to apply it to your slide. Note that one transition style is none, select this if you want to remove a transition from a slide
- Click Effect options for more options about the selected transition, for example if you chose the Wipe transition you could select the direction of wipe.
- On the right of the ribbon there are more options to play a sound during the transition and choose the duration of the transition in seconds. You can also check the box to apply this transition to all slides in the presentation
- The final options at the right of the ribbon control how you advance to the next slide - if you're giving a speech you might want to advance on a click of the mouse (or laptop button) or the next slide could appear after a specified time (in seconds) or both
top of page
Animations

Unlike transitions which control the entrance of slides, animations control how objects (text boxes, images etc) appear within a slide. So the slide could be blank to start off with, then lines of text and pictures could appear each time you click the mouse during your presentation.
To apply animations:
- Click the first object on the slide you want to have animated (picture, text box etc). Animations occur in the order you apply them, but you can change this later.
- Go to the Animations ribbon
- Choose an animation for that object: Appear, Fade and Fly in are shown in the diagram above but others are available by clicking the arrows at the right of this box.
- Effect options are available for each animation, these will vary depending on the animation selected
- Apply animations to other objects on your slide
- You can reorder the animations by using the controls at the right of the ribbon: click on the object with the animation then make it occur earlier or later
top of page
Slide Master
Suppose you've got a presentation with 20 slides: a Title slide, 15 Title & Content slides and 4 Blank slides. You want to add a logo to every slide, but this would mean a lot of work changing all 20 slides. The easier way to do this is to use the Slide Master. Any changes you make to this will apply to all slides of that type, so you only need to add the logo once. You can also make changes to all the Title, Title & Content or Blank slides in the same way.
To edit the Master Slide
- Go to the View ribbon
- Click Slide Master in the Master Views section
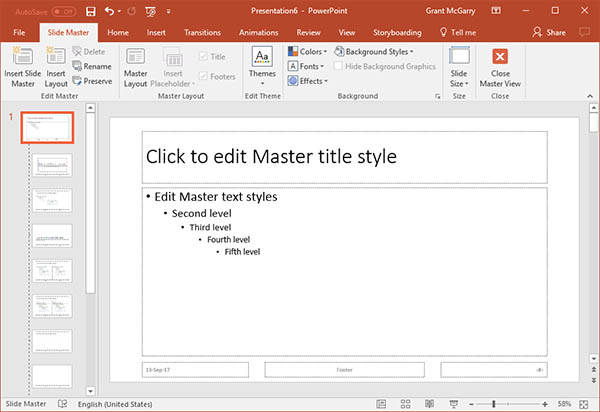
- Slide Master view looks like normal view, you've got a navigation pane on the left and you can click a slide there to see it in detail on the right. But remember that any changes you make to these slides will apply to all slides with that layout.
- If you hover the mouse on the slides in the navigation pane, you'll see a screen tip that tells you the layout of that slide (Title, Title & Content, Blank etc) and which slides on your presentation have that layout. Changes to the top slide would apply to all slides, and changes to the slides below would only affect slides with that layout.
- You can make changes to the formatting of text boxes - font, color, alignment, fill colour etc and change the position
- You can also add pictures, text, footers and so on. Remember that anything you add will be put on all slides with that layout.
- When you're finished editing the master slides, click the Close Master View button on the right of the ribbon to return to normal view
top of page
Blank Slides
Blank slides don't have any text boxes already on them so you can add what you want to the slide. To add a blank slide:
- On the Home ribbon, click the New Slide button (with the drop down arrow). You should see a selection of slide layouts.
- Click the Blank Slide layout
Next, click the Insert ribbon to add some content to the new slide.

Add a text box
- Click the Text Box button on the Text section of the Insert ribbon
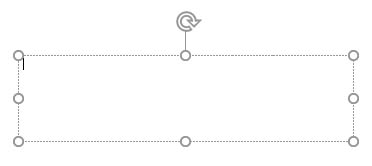
- Click and drag on the slide to draw your text box. It should look similar to this image:
- The text box will automatically shrink to fit its contents, but you can click and drag the cicular handles around the border to specify the maximum size (make sure the mouse pointer changes to a double-headed arrow before you click and drag)
- If the mouse pointer has a 4 headed arrow as you move it in the text box, you can click and drag to move the box
- Type text to add it to your text box, use the Home ribbon to format the font, size, colour, alignment etc.
Add a picture
- Click the Picture button on the Insert ribbon
- Browse to the folder where the picture is saved on your computer
- Click the picture to select it then click the Insert button at the bottom right of the dialog box
- Use the handles to alter the size and position of the picture (same as text box)
- You can also insert Clip Art pictures if you don't have a suitable one saved on your PC
top of page
Images
Images can make your presentations more engaging for your audience. You can add your own images which are stored on your computer, or use PowerPoint to find Clip Art or Online Pictures (Clip Art is used by older versions of PowerPoint and is being replaced with Online Images).
Adding your own images
Covered in the blank images section above.
Clip Art
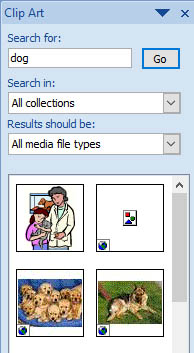
- Go to the Insert ribbon and click Clip Art. The Clip Art pane will be displayed on the right
- In the Search for box, type what you're looking for. Try to keep your search terms as general as possible and check your spelling otherwise you may not get any results
- Click the Go button, you should see results below
- Click in the centre of an image to insert it on your slide
Online Pictures
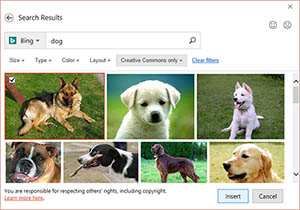
- Select Online Pictures on the Insert ribbon. This uses a Bing image search
- Type what you're looking for in the search box and click the search button (magnifying glass) or press enter
- Click a picture to select it
- Click the Insert button at the bottom right
Resize a picture
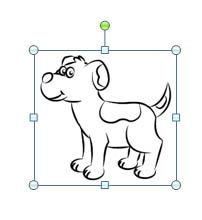
When you insert an image on a slide (or you click on an image on a slide) you'll see a border appear around the image with handles on it. If you move the mouse pointer over these handles, it will change to a double-headed arrow. Click and drag these handles to change the size of the image:
- The square handles can be dragged to change height or width
- The circular handles change height and width at the same time. Hold down the Shift key on your keyboard while you drag to keep the aspect ratio (ie the ratio of width to height) otherwise your images might look to narrow or squashed.
- The green circle at the top will rotate the image
Specify an exact image size
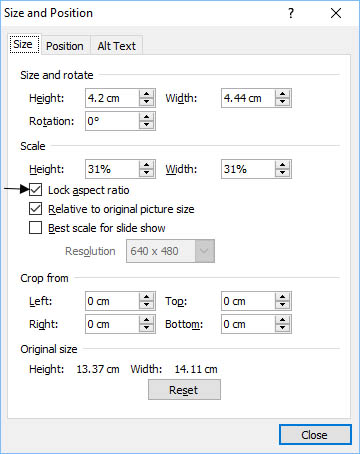
- Right-click on the image to get a context menu
- Click Size and Position from the menu
- Change the height and width to the desired amounts
- Uncheck the Lock aspect ratio box if you want to change the ratio, for example this would be necessary if you wanted to make a rectangular image square.
top of page